Free Baby Wolf Amigurumi Crochet Pattern (With Movable Arms and Legs)
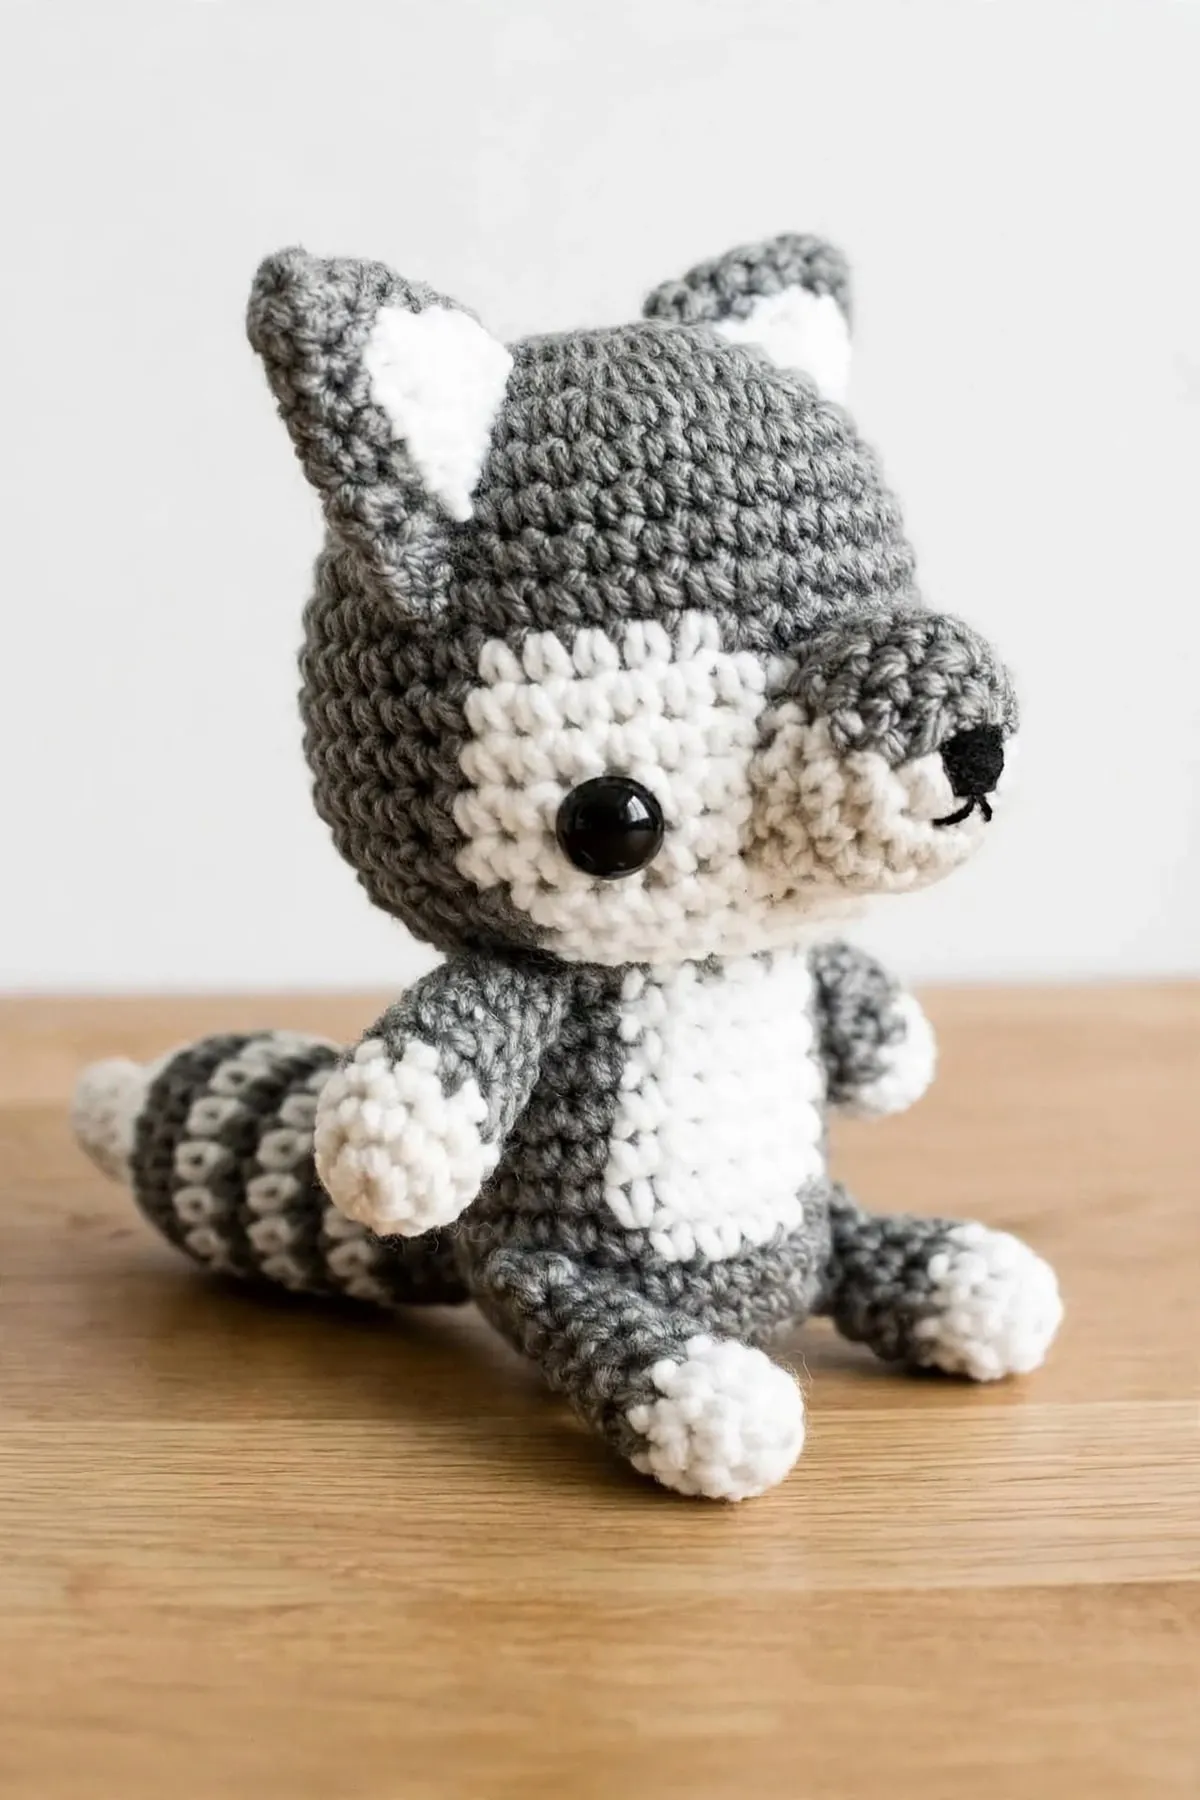
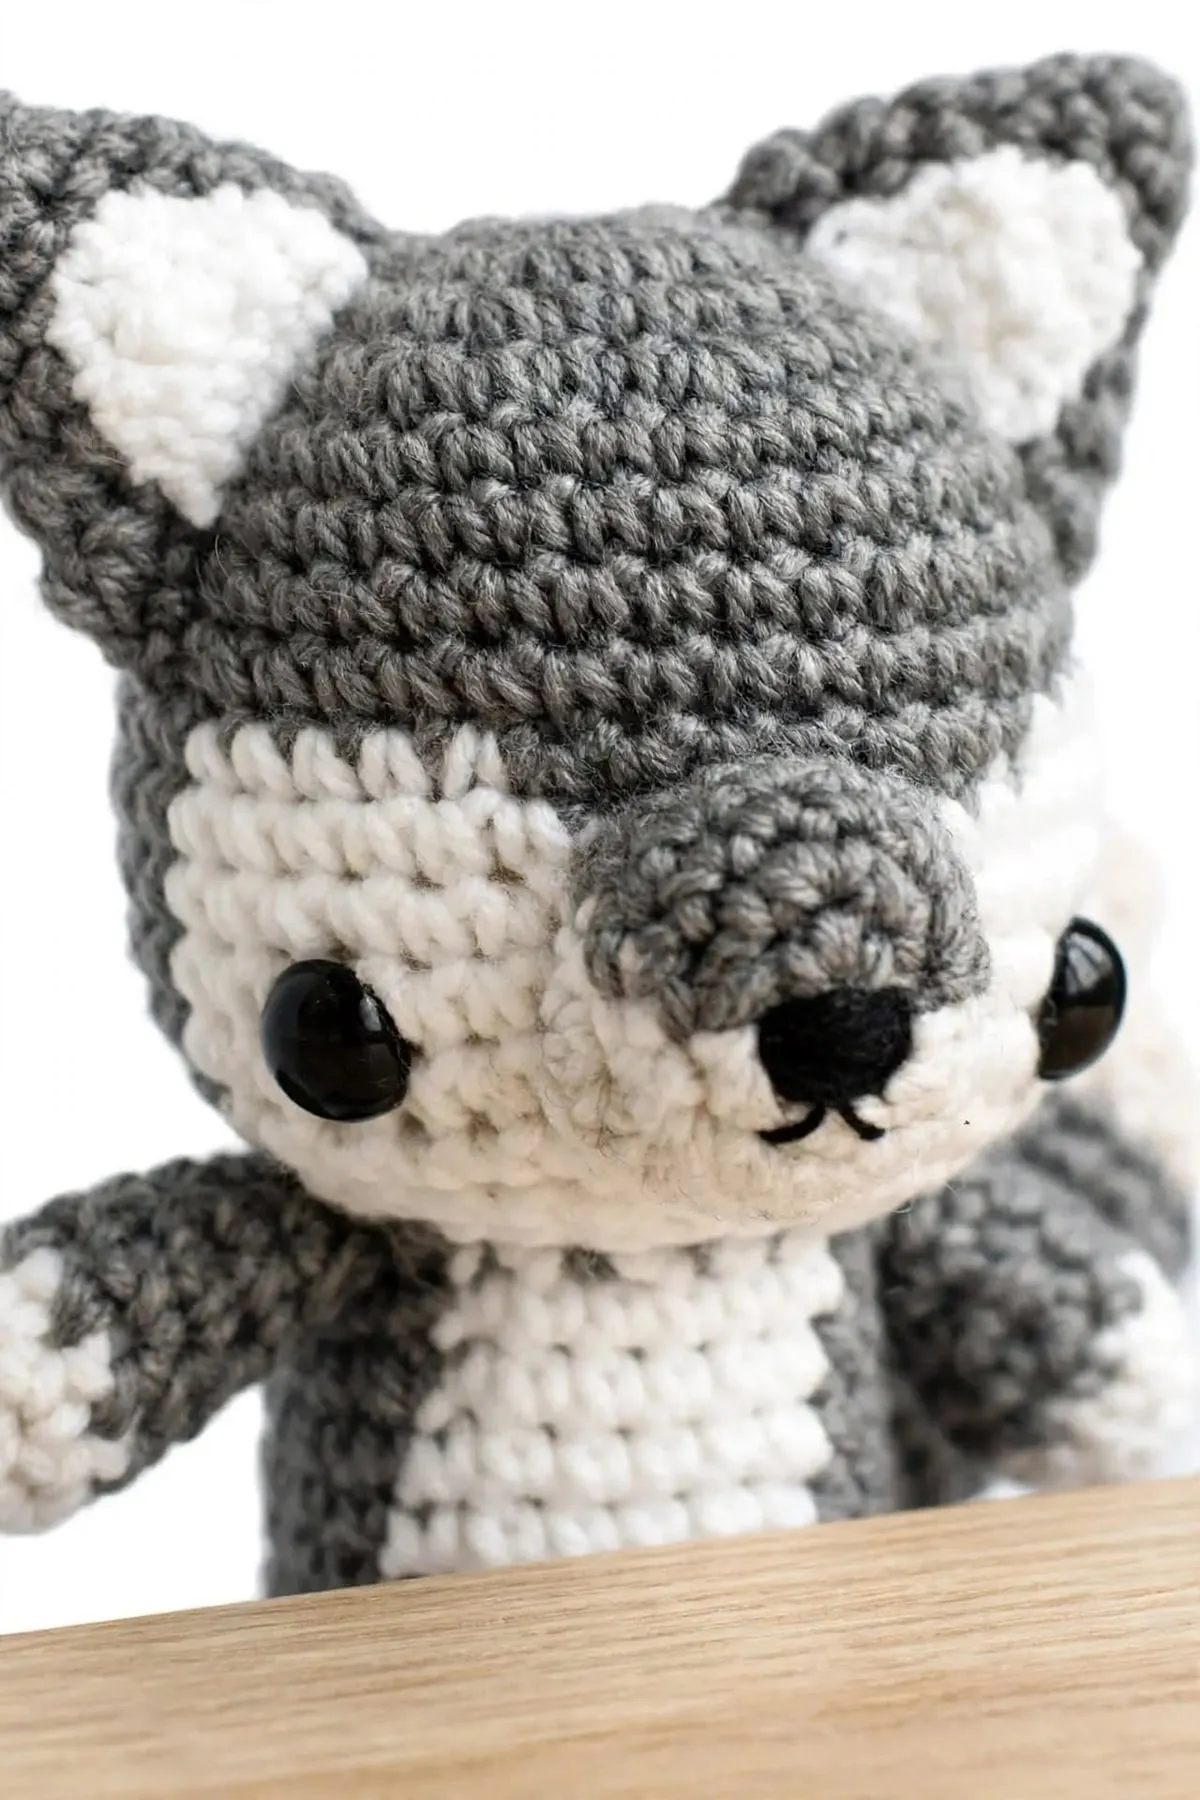
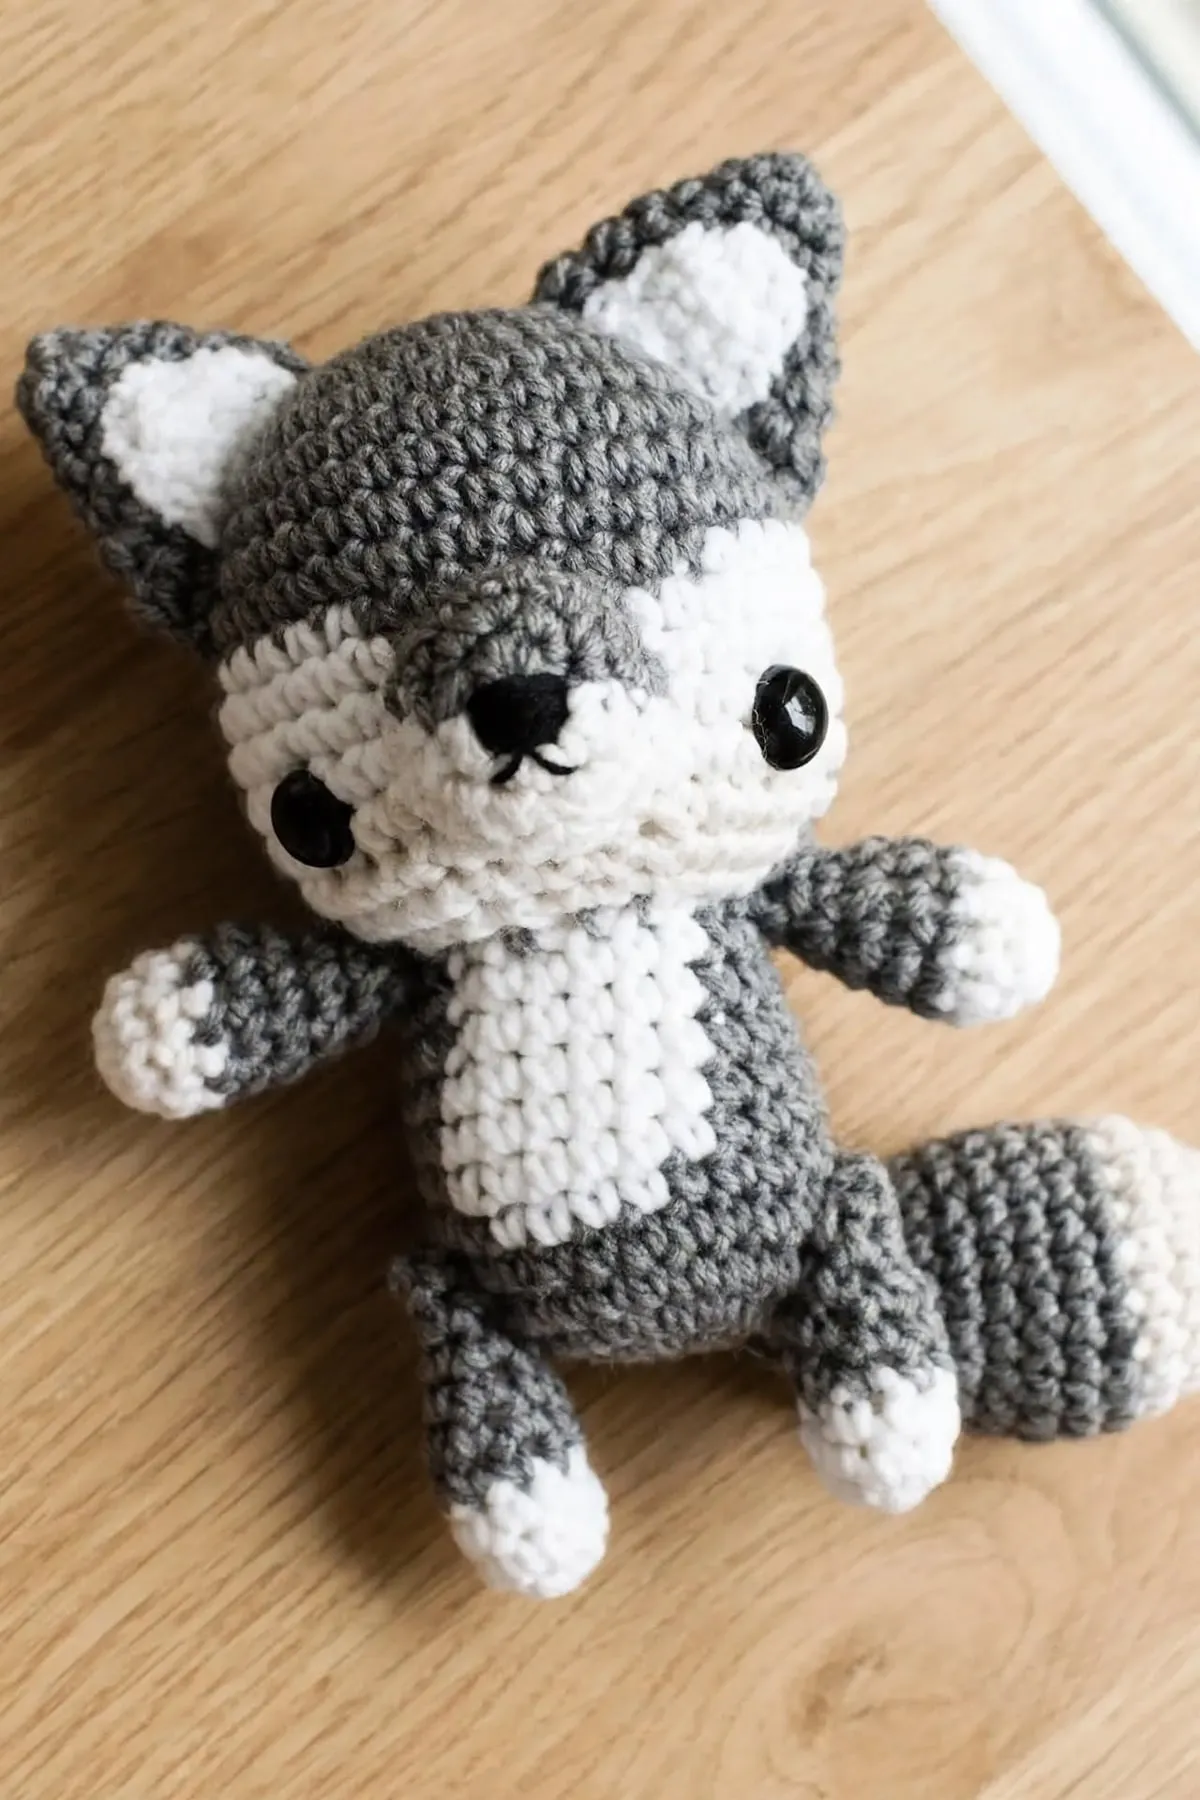
This little gray wolf pup has a white face and tummy, pointy ears, and a fluffy white-tipped tail. The arms, legs and tail are attached with simple joints, so they move, and your wolf can sit, wave and pose.
 Save
Pattern Highlights
- The arms, legs and tail move, so the wolf can sit up or pose.
- The white face and tummy are worked right into the rounds, so there are no patches to sew on.
- It stands about 8 in (20 cm) tall, a lovely size for a gift.
- Every round is written out with a stitch count, so you can check as you go.
Materials
- Medium weight (#4) yarn in gray and white
- 4.25 mm (G) crochet hook
- 1 pair of 15 mm safety eyes, for the eyes
- 5 safety eyes or doll joints, 15 mm, for the arms, legs and tail
- Black embroidery thread, for the nose and mouth
- Polyester fiberfill stuffing
- Yarn needle, embroidery needle and pins
- Stitch marker
Abbreviations used
This pattern uses US crochet terms. Tap any abbreviation for a full explanation, or see the complete crochet abbreviations list.
About this wolf
This baby wolf is made in seven kinds of pieces: a round head with a white face worked in, a gray and white snout, two pointy ears with white inner ears, a body with a white tummy, four arms and legs, and a tail. The arms, legs and tail are attached with simple joints, so they move.
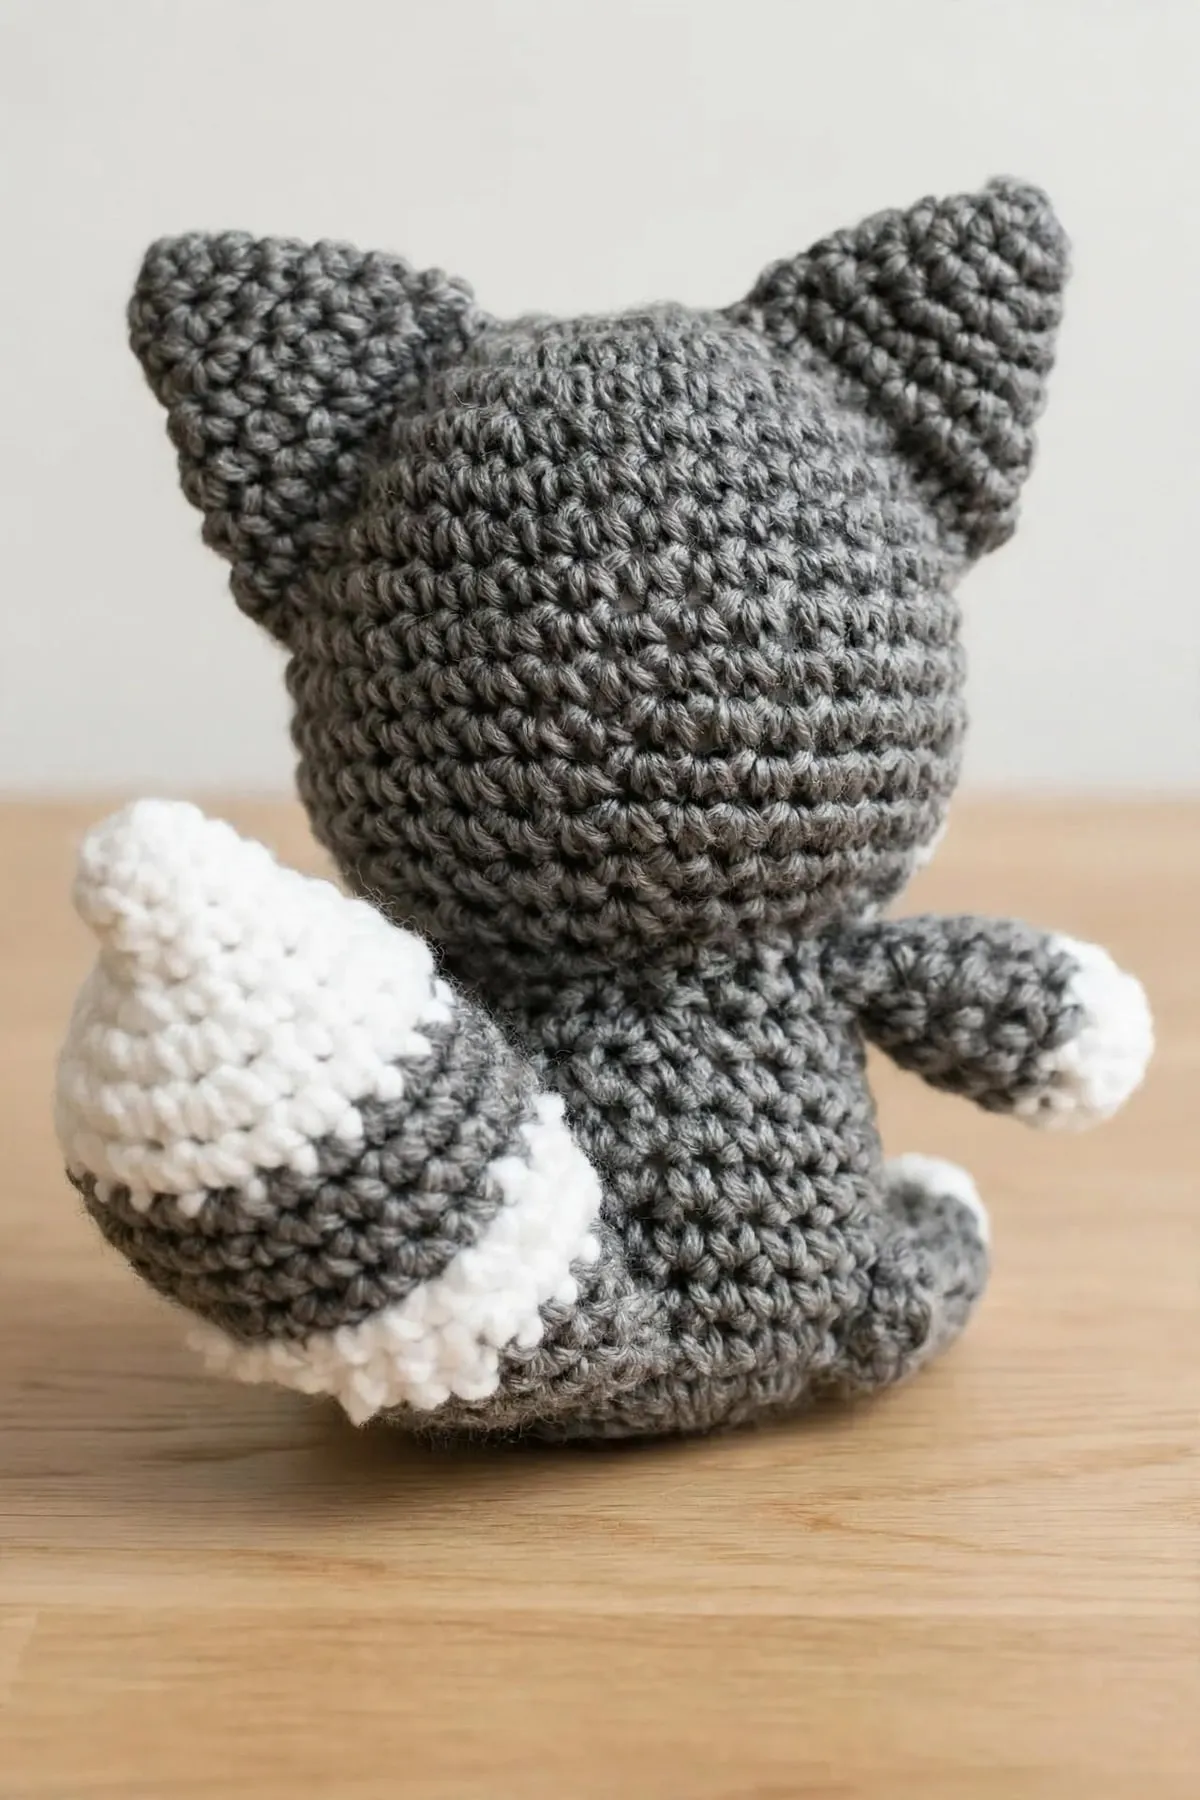
You’ll need gray and white yarn, a pair of safety eyes for the face, and five more safety eyes or doll joints for the arms, legs and tail.
Before you start
This one is rated intermediate. The stitches are all single crochet, but the face and tummy use color changes in the middle of the rounds, including in the middle of a decrease, and the limbs are attached with joints.
- It’s worked in a spiral. Don’t join your rounds. A stitch marker in the first stitch of each round keeps your place.
- Every piece starts with a magic ring. If you’re new to it, my magic ring tutorial walks you through it step by step.
- Don’t sew the head on too soon. You’ll need to reach inside the body to snap the joint washers on, so the head goes on last.
How the white face and tummy work
The white parts are worked right into the rounds. In each color-change round, you crochet a few stitches in gray, switch to white for the face, then switch back to gray.
To make a clean switch, work the last gray stitch until 2 loops are left on your hook, then pull the white through. In the decrease rounds, the switch happens in the middle of a sc2tog: pull up the first loop in one color and the second loop in the next.
How the joints work
Each arm, leg and the tail gets a safety eye or doll joint pushed out through its inner side, near the top. The post then goes through a stitch in the body, and the washer snaps on from inside. That’s why the head stays off until the very end: you need to reach inside the body.
Tips for success
- Pin everything first. Pin the body to the head, then pin the arms, legs and tail in place before pushing any joints through.
- Mirror the ears. Turn one ear over so the slip stitches are on the front of one ear and the back of the other.
- Stuff the head and body firmly. Firm stuffing helps the wolf sit up and keeps the joints snug.
- Stitch the nose before sewing on the snout. It’s much easier to embroider while the snout is still in your hand.
Skills you’ll use
- How to crochet a magic ring, to start every piece
- How to single crochet, used for every round
- How to read a crochet pattern, if the brackets and stitch counts look confusing
- How to weave in ends, for all those color changes
A little wolf pup makes a lovely gift for an animal lover. 🐺
The Pattern
- Skill level
- Intermediate
- Yarn
- Medium weight (#4) yarn
- Yarn amount
- About 50 yd (46 m) gray and 30 yd (27 m) white. Amounts are estimates. One small ball of each is plenty.
- Hook
- 4.25 mm (US G)
- Gauge
- Not critical. Work tightly so the stuffing doesn't show.
- Finished size
- About 8 in (20 cm) tall standing and 5 in (12.7 cm) wide ear to ear. The tail is about 4.5 in (11 cm) long.
- Time
- Varies with experience
Head (gray, with a white face)
- Rnd 1: 7 sc in MR. (7)
- Rnd 2: Inc 7 times. (14)
- Rnd 3: [Inc, sc in next st] 7 times. (21)
- Rnd 4: [Inc, sc in next 2 sts] 7 times. (28)
- Rnd 5: [Inc, sc in next 3 sts] 7 times. (35)
- Rnds 6–9: Sc in each st around. (35)
- Rnd 10: Sc in next 9 sts, change to white. Sc in next 5 sts, change to gray. Sc in next 7 sts, change to white. Sc in next 5 sts, change to gray. Sc in next 9 sts. (35)
- Rnd 11: Sc in next 9 sts, change to white. Sc in next 7 sts, change to gray. Sc in next 3 sts, change to white. Sc in next 7 sts, change to gray. Sc in next 9 sts. (35)
- Rnds 12–14: Sc in next 9 sts, change to white. Sc in next 17 sts, change to gray. Sc in next 9 sts. (35)
- Insert the 15 mm safety eyes just above rnd 14, with 11 stitches between them.
- Rnd 15: Sc2tog, sc in next 3 sts, sc2tog, sc in next 2 sts, change to white. Sc in next st, [sc2tog, sc in next 3 sts] 3 times, sc2tog changing to gray. Sc in next 3 sts, sc2tog, sc in next 3 sts. (28)
- Rnd 16: Sc2tog, sc in next 2 sts, sc2tog, sc in next st, change to white. Sc in next st, [sc2tog, sc in next 2 sts] 3 times, sc2tog changing to gray. Sc in next 2 sts, sc2tog, sc in next 2 sts. (21)
- Start stuffing.
- Rnd 17: Sc2tog, sc in next st, sc2tog, change to white. Sc in next st, [sc2tog, sc in next st] 3 times, sc2tog changing to gray. Sc in next st, sc2tog, sc in next st. (14)
- Rnd 18: Sc2tog, sc2tog changing to white. [Sc2tog] 3 times, sc2tog changing to gray. Sc2tog. (7)
- Sl st in next st. Finish stuffing. Fasten off, leaving a tail. Thread it through the front loop of each stitch and pull tight. The hole doesn't need to close completely, since the body covers it.
Snout (gray and white)
- Start with gray.
- Rnd 1: 6 sc in MR. (6)
- Rnd 2: Inc in next 3 sts, change to white. Inc in next 3 sts, change to gray. (12)
- Rnd 3: Inc, sc in next 5 sts, change to white. Inc, sc in next 5 sts, change to gray. (14)
- Rnd 4: Sc in next 7 sts, change to white. Sc in next 7 sts, change to gray. (14)
- Rnd 5: Sc in next 7 sts, change to white, leaving a long gray tail for sewing. Sc in next 7 sts. (14)
- Sl st in next st. Fasten off, leaving a long white tail for sewing.
- Nose and mouth: with black embroidery thread, stitch a filled triangle nose at the tip of the snout, where the gray meets the white. From the bottom point of the nose, stitch a short line straight down, then a small angled line on each side for the mouth.
- Stuff the snout and sew it onto the head, centered over rnds 11–15.
Ears (make 2, gray)
- Rnd 1: 6 sc in MR. (6)
- Rnd 2: Sc in each st around. (6)
- Rnd 3: [Inc, sc in next 2 sts] 2 times. (8)
- Rnd 4: [Inc, sc in next 3 sts] 2 times. (10)
- Rnd 5: [Inc, sc in next 4 sts] 2 times. (12)
- Rnd 6: [Inc, sc in next 4 sts] 2 times, inc 2 times. (16)
- Rnd 7: Sc in next 14 sts, inc 2 times. (18)
- Sc in next 2 sts, sl st in next 3 sts. Fasten off, leaving a long tail for sewing. Don't stuff.
- Flatten the ears. Turn one over so the left ear has the 3 sl sts on the front and the right ear has them on the back, so the ears mirror each other.
Inner ears (make 2, white)
- Leave a long tail at the start for sewing.
- Row 1: Ch 5, sc in 2nd ch from hook and in each ch to the end. Ch 1, turn. (4)
- Row 2: Sc2tog 2 times. Ch 1, turn. (2)
- Row 3: Sc2tog. (1)
- Fasten off, leaving a tail. Sew each inner ear onto the front of a gray ear using both tails.
- Sew the ears to the head, about 3–4 stitches out from the outer corner of each eye, from about rnd 2–3 down to rnd 9.
Body (gray, with a white tummy)
- Rnd 1: 7 sc in MR. (7)
- Rnd 2: Inc 7 times. (14)
- Rnd 3: [Inc, sc in next st] 7 times. (21)
- Rnd 4: [Inc, sc in next 6 sts] 3 times. (24)
- Rnd 5: Sc in each st around. (24)
- Rnd 6: Sc in next 10 sts, change to white. Sc in next 4 sts, change to gray. Sc in next 10 sts. (24)
- Rnds 7–9: Sc in next 9 sts, change to white. Sc in next 6 sts, change to gray. Sc in next 9 sts. (24)
- Rnd 10: Sc2tog, sc in next 2 sts, sc2tog, sc in next 3 sts, change to white. Sc in next 6 sts, change to gray. Sc in next 3 sts, sc2tog, sc in next 2 sts, sc2tog. (20)
- Rnd 11: Sc in next 7 sts, change to white. Sc in next 6 sts, change to gray. Sc in next 7 sts. (20)
- Sl st in next st. Fasten off, leaving a long tail for sewing. Stuff the body.
- Pin the body to the head to help you place the arms, legs and tail. Don't sew the head on yet.
Arms and legs (make 4)
- Start with white.
- Rnd 1: 6 sc in MR. (6)
- Rnd 2: [Inc, sc in next 2 sts] 2 times. (8)
- Rnd 3: Sc in each st around. (8) Change to gray.
- Rnds 4–5: With gray, sc in each st around. (8)
- Stuff.
- Rnd 6: Sc in next 6 sts, sc2tog. (7)
- Rnd 7: Sc in each st around. (7)
- Rnd 8: Sc in next 5 sts, sc2tog. (6)
- Sl st in next st. Fasten off, leaving a tail for sewing.
- Push the post of a safety eye or doll joint out through the inside of the limb, one round down from the top, in the center. Sew the top closed.
Tail (white tip, gray tail)
- Start with white.
- Rnd 1: 6 sc in MR. (6)
- Rnd 2: Sc in each st around. (6)
- Rnd 3: Inc, sc in next 4 sts, inc. (8)
- Rnd 4: Sc in each st around. (8)
- Rnd 5: Inc 3 times, sc in next 5 sts. (11)
- Rnd 6: [Inc, sc in next st] 4 times, sc in next 3 sts. (15)
- Rnd 7: [Inc, sc in next 2 sts] 4 times, sc in next 3 sts. (19)
- Rnd 8: Sc in each st around. (19) Change to gray.
- Rnd 9: With gray, inc, sc in next 6 sts, inc, sc in next 4 sts, inc, sc in next 6 sts. (22)
- Rnds 10–11: Sc in each st around. (22)
- Rnd 12: Sc in next 7 sts, sc2tog 4 times, sc in next 7 sts. (18)
- Rnds 13–14: Sc in each st around. (18)
- Rnd 15: Sc in next 5 sts, sc2tog 4 times, sc in next 5 sts. (14)
- Stuff.
- Rnds 16–17: Sc in each st around. (14)
- Rnd 18: Sc in next 3 sts, sc2tog 4 times, sc in next 3 sts. (10)
- Sl st in next st. Fasten off, leaving a tail for sewing.
- Push the post of a safety eye or doll joint out through the inside of the tail, one round down from the top, in the center. Sew the top closed.
- Striped tail (optional, like some of the photos): from rnd 9 on, switch between gray and white every 2 rounds. The stitch counts stay the same.
Assembly
- Arms: place them just under the head, on each side. Push each joint post through a stitch in the body.
- Legs: place them below the arms, around rnds 4–5 of the body. Push each joint post through a stitch in the body.
- Tail: place it on the back, slightly to the left, at an angle over about rnds 4–6. Push the joint post through a stitch in the body.
- Unpin the head, take out some of the body stuffing, and snap the washers onto all the joint posts from inside the body. Restuff firmly.
- Pin the head back onto the body and sew it on securely all the way around.
Pattern notes
- Work in a continuous spiral. Don't join the rounds. A stitch marker in the first stitch of each round helps.
- To change color, work the last stitch in the old color until 2 loops are left on your hook, then pull the new color through. To change color in the middle of a sc2tog, pull up the first loop with the old color and the second with the new color.
- At each color change you can cut the old color and tie the tails together inside, or carry it loosely inside the piece.
- Safety eyes and joints aren't suitable for children under 3. For a baby-safe version, embroider the eyes and sew the limbs on with yarn.
Keep this pattern handy
Print it now, or get the free PDF to save on your phone or tablet.
Free Baby Wolf Amigurumi Crochet Pattern (With Movable Arms and Legs) · Pattern by mycrochetmakes · mycrochetmakes.com/baby-wolf-amigurumi-crochet-pattern/
Free for personal use. Please don't sell or redistribute this pattern.
Frequently asked questions
Can I use safety eyes instead of doll joints?
Yes. That's what this pattern suggests. A 15 mm safety eye works as a simple joint. Push the post through the limb and the body, and snap the washer on from inside.
How do I change color in the middle of a decrease?
Pull up the first loop with the color you're using, then pull up the second loop with the new color, and finish the sc2tog with the new color.
Do I cut the yarn at every color change?
You can cut and tie the tails inside, or carry the unused color loosely inside the head and body. Carrying is quicker. Cutting gives the neatest color edges.
Is this wolf safe for babies?
No. Safety eyes and joints aren't suitable for children under 3. For a baby-safe version, embroider the eyes, and sew the arms, legs and tail on with yarn instead of joints.
Why is the tail striped in some photos?
That's an optional variation. Switch between gray and white every 2 rounds from round 9 of the tail. The stitch counts don't change.